Design, reverse engineering

Tide Will Clean Up

Our final big project for my Visual Communications class was to take an advertisement from the real world, examine all of its properties and recreate an ad that could go along with the same campaign.

I chose an ad campaign that was visually appealing to me and maybe a bit out of the norm for a typical ad for the company. It’s from Tide and message is that Tide will clean your clothes so well it could clean the stripes off of a zebra or the spots off a leopard. This is appealing to a wide audience and everyone, not just moms wash their clothes and want them to be clean and bright.

We were asked to include a breakdown of the ad and our new ad on an InDesign slide. This would allow us to use all of the different programs we used this semester (InDesign, Illustrator, and Photoshop) into one project. Here is my slide presentation:

Slide Design

Slide Design2

Slide Design3

Slide Design4

Slide Design5

Slide Design6

Slide Design7

Slide Design8

Slide Design
You can download a PDF of the slide here: Slide Design

I chose to use a different tagline but I one I thought would work and is important to people who want their white’s bright! I was trying to think of an animal that was already white and found this cute polar bear that was consistent with the other animal designs. I fixed him up a bit in Photoshop and then brought all of the elements together in Illustrator to create the ad. I’m pretty happy with the result and think it fits consistently with the original ads. Let me know what you think!

Design

Thor Uses Estwing!

This week we were instructed to make an advertisement combining elements in Photoshop. We had a project generator that decided our product and demographics. The product I was given was a hammer to sell to 18-24 year old males with a high school diploma. I chose Estwing as the brand.

Keeping my young male audience in mind, I threw around a couple of ideas like using the Minecraft hammer somehow and another with a young man hanging up a found street sign with a hammer is his first apartment as art. But ultimately I went with the idea of Thor holding an Estwing hammer and having the slogan be “Take on that project like a superhero”.

We had to use Photoshop to join a few elements together. I found this cool picture of Thor swinging his hammer and got rid of the background.AoU_Thor_0001

Then I found an Estwing hammer on their website. I got rid of Thor’s hammer and photoshopped the Estwing hammer into his hand.

61onlEXSlBS._SL1452_

I found a cool, simple background of blue but that highlights him in the center. I then added text and this is what I came up with:

Hammer Ad Final.png

I used a font that I had called American Captain that looked like a superhero font but not too kitschy. I thought it looked strong. I used a bit of a drop shadow for a slightly 3D look. The Estwing logo had one as well. Then I  added the tagline “Hammers for Heroes”. I used the What the Font website to find a  font similar to the Estwing logo. I also loved that Estwing has a wing in the logo and Thor classically has wings on his helmet.

Next we needed to adapt our ad to work in different advertising mediums. I was given magazines and blogs.

I chose to do a half-page ad for a magazine that measures 8.5 x 5.5. I didn’t have to change it up too much. Just some cropping off the bottom. Here is that ad:

Hammer Ad Magazine

Then I had to adapt it for a blog which is 300 x 250 px. Here is that ad:

Hammer Ad Blog

Could probably use a little more tweeking, but I think they turned out ok.

I am really enjoying getting to know my way around Photoshop and while I still have a lot to learn it feels great to accomplish something like this. Who knew that Thor used an Estwing? I think it looks pretty good on him.


Design, Uncategorized

Sewing Icons

This week’s assignment in my Visual Communications class was super fun. I will admit when I first read that we had to design icons ourselves from scratch using Illustrator I was pretty intimidated! But as I have taken some of the new things I have learned i.e. shapes builder, rounding corners and the like, I found that I could actually pull things together and I think they came out great!

Seriously, I’m actually pretty proud of them. My hobby is quilting and that’s the first thing I thought of when I read this assignment. I thought how cute little sewing icons would be! I also wanted to use color, but not too much color so that they looked cohesive. I chose my favorite colors, aqua and pink which I think play well together. I knew that I would need another neutral color and of course half of my object have silver metal components, so grey it was. I then used a darker grey for additional details.


Part of the assignment which helped in learning more about how Illustrator works was to save our icons in different sizes. These little cuties are 60 px X 60 px. They would be perfect as actual little icons. It was really good to shrink them down and see what little tweaks needed to happen. I did have to mess with line width afterward. Especially on the spool of thread. It was just a giant blob of color.

Then we had to enlarge them to 400 px X 400 px. This is where you can see any mistakes that were made. I did have to mess with the scissors and the needle a bit to take out a few kinks. I think the hardest part is not continually tweaking. I think I could work on these for hours and hours. At some point you just have to say done! I will go through each shape and break it down a little. Starting with the button that is obviously just a bunch of circles and the easiest icon to make of the set.

This tool may not be familiar to everyone but is indispensable to every quilter. It is a rotary cutter. It has a sharp, round blade that is used with a straight edge ruler to perfectly cut fabric. I made circles for the blade a rectangle body with rounded end and joined them with the Shape Builder.


For the scissors I drew ovals and rectangles and joined them with a shape builder. The blades are lines that I used the Width Tool to make the sharper ends, keeping it rounded to match the rest of the shapes. Then a circle in the middle as the connector bolt.


For the thread I made two rectangles and then rounded the edges and pulled two sides down to form the shape. Then I drew lines and rounded the end. Then I used the Distribute Objects Align tool. to evenly space them. The loose thread is just a painted line.

The sewing machine was the object I was the most worried about but it came together more easily than I thought it would. Three rectangles with various rounded edges and then details added. 

The needle was a line that I used the Width Tool with. At the top I added an oval. This one actually took some time to get right. The width was tricky and joining it at the right angle was too. The thread is just a painted line with rounded ends.

So that’s it! I hope you like my little icon set. There may have been easier ways to accomplish what I did, but what I did was using the knowledge I have right now. I look forward to learning more in both Illustrator and InDesign. And I love my little icons! 🙂


Design

Hey, I Designed a Magazine Spread!

What I am loving about being back in school is that I get to learn and try things that normally I would not have attempted! This week is a perfect example. We were asked to design a magazine spread using pictures we took and the design ideas we have been learning about this semester. Say what?! But guess what, I did it! That being said, it’s far from being a work of art but I sure enjoyed the process.

Without further ado, here is my spread:

(In case you are wondering, I left white space on the top and bottom of the 2nd and 3rd pages as a design choice. I think in an actual magazine it will look great, but it just looks like the page has shrunk online.)

Assignment

The challenge was for us to find an article online and turn it into a 3 page magazine spread with a 2-column text. We would need to create a title page, subheadings, and a pull out. And we had to place an element and have the words wrap around it.
The original article I chose was written by Pres. Henry B. Eyring of the Twelve Apostles and can be found on lds.org HERE. I really like the message as it seems life is crazier than ever these days and I am always seeking peace. It’s worth the read! My target audience is obviously an LDS readership of 18-118 year olds. But really these principles relate to everyone needing to find peace in their lives.

Photography

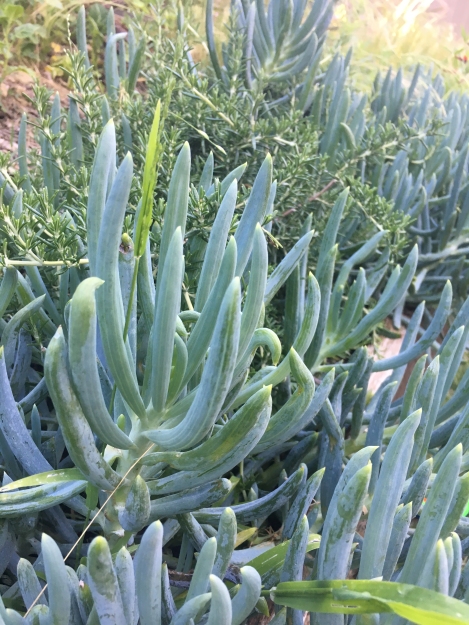
The other facet we needed to bring into the project was taking our own pictures using the rules of photography that we had learned in a previous week. When I thought about what kind of picture would work well with an article on peace I immediately thought of trees. They are so serene from the lacy leaves to the green color, perfect. So I took pictures of a tree against the bright blue sky we were enjoying that day. Then I took a shot of the sun peeking through the leaves which I loved because the “son” is where our peace truly comes from. It also placed perfectly with the rule of thirds theory.

These are my originals. Again, nothing to send into National Geographic, but I enjoyed thinking it through and they worked for what I was trying to achieve.

Fonts

The assignment challenge was to find fonts that were suitable for the article and were also contrasting. Because the talk I chose was religious in tone and about peace I knew it needed to have a more traditional feel. I felt that a script font and a sans serif font would do the job. I wanted the word “Peace” from the title to be in script. I toyed around with a few choices but ultimately ended up with a font called Candlescript. I loved the fancy capital letters and knew they would add a design element to the spread.Candlescript
My next challenge was to find a sans serif font that would go well with it. With my first draft I chose the font Gadugi, pretty basic. I got some good feedback that it wasn’t too exciting and maybe overused. I’ve never personally used it, but there you go. I was also told that I should left justify the byline and switch all the lettering to white. Here is my original draft front page:


I took all of that advice to heart and went to work! I settled on probably my favorite sans serif font and that is Century Gothic.Century Gothic

I am sure that it is overused, but I keep going back to it for it’s clean lines and simplicity. It’s really not that different, but…here is the updated front page:

I’m honestly not sure that I like it better, but trying to take advice and go with what the “client” wants. I also used Century Gothic on the rest of the article.

Design Elements

We needed to create at least one pullout or quote from the article to enlarge and place within the text, I ended up with two. I really like the way they look and break up the article making somehow easier to read. For each of the first words I used the Candlescript font again for design purpose and I also used that on the first letter of the article. I  created three sub-headings that were not originally part of the talk and used a bold version of Century Gothic for that. The last element I want to discuss is color. Again for this article I wanted to convey peace. I think green


and blue bring such peaceful feelings and given that my picture of a tree against a blue sky was the main element, it worked perfectly. Because blue was the dominant color on the cover page I went with a soft green for the 2nd and 3rd pages. Black type still shows up on it and again it promotes a soft, peaceful feeling.

Wrap – up

I survived my first magazine layout! I was a bit overwhelmed at first by all of the different elements that had to come together but having learned about what makes each of those elements work the best, I think it came together well. I actually really enjoyed the process and the feedback I receive from others is very helpful. I would never have tried this on my own, but now I can say I have done it. I am feeling so blessed for the opportunity to attend school and learn new things!


Design, reverse engineering

Photography Rules!

Photography rules! And there are rules for good photography.
I’m going to cover three of them today, Rule of Thirds, Leading Lines, and Depth of Field using photography from the web and some of my own photographic work.

Rule of Thirds:


Photo Credit: Unknown Link

Using the rule of thirds simply means to break your picture into thirds both vertically and horizontally. This creates an imaginary grid and four points of focal interest where the eye is naturally drawn. If you place objects in your photo near these four points the photograph is pleasing to the eye. 

In this example the of a sailboat on the water at sunset, both the sailboat and the setting sun are on one of the four focal points. This creating an aesthetically pleasing picture.

  Leading Lines:


Photo Credit: Matthew Peoples Link

Leading lines is just what it sounds like. There are lines created in the photograph that lead the eye into one direction. They usually lead to a main subject or focal point, but sometimes it can simple lead to an imaginary end like a road that goes on and on or the horizon. This can also lead to a sense of motion and a feeling of going somewhere.


In this example the stairway along with the railing and concrete blocks lead the eye upward. The fence and lines of the building lead the eye downward and they all converge into the single focal point of the doorway.

Depth of Field


Photo Credit: Unknown Link

The depth of field in a photograph is the difference between the sharpness of the focal object and the rest of the photo. When you really want a certain object in your photo to stand out you need to make sure it is clearly in focus and blur out the rest of the objects. It also gives you a better sense of what it closer and further away. Depth of Field is created by changing your aperture on your camera.


In this example the bird in the forefront is clearly the object of focus in this picture. He is closest to us and sharp. The rest of the birds and the background are blurred, focusing the eye on the single bird.

My Photographs

In this next section I’m going to apply what I’ve learned and take photos following the rules.

Rule of Thirds

Rule of Thirds Palm

I took a snap of these palm trees against a cloudy sky with the moon peaking through the other night at the mall. I love how the trees were lit and golden against the cold sky.

Rule of Thirds Palm 2

As I add the grid to see the Rule of Thirds, it works! The main trees in each set are right on the intersections of the grid. The picture is therefore aesthetically pleasing to the eye.

Leading Lines

Leading Lines Awning

This is a picture from my back yard of the wooden awning on my patio. I love the dark lines and shadows against the bright blue sky. Gorgeous day!

Leading Lines Awning 2

The lines in the awning lead the eye in the same direction going forward and finally ending at the last beam.

Depth of Field

Plant Depth of Field 2

I found these cool low moisture plants while on a walk today. I thought they would make a perfect subject to show depth since there are some in front and behind.

Plant Depth of Field

I placed the focus on the front plant and tapped and held down on the screen of my phone to make sure that’s where it stayed. The plants behind are blurred out showing the depth.

While there can be a lot to think about when taking a picture to make sure it looks good, there are just a few simple rules that the ones shared here that can make a big impact. The rules are simple if you follow the rules!

Design, reverse engineering

Macaroni Grillin’ Fonts

This is a recent email advertisement I received from the Macaroni Grill restaurant and I thought it showed great diversity with the three different font typefaces used.

Font #1: The first font used is a handwritten Script font. It could be categorized as script because it is a script, but I think it could also be categorized as a decorative font because it is so informal.

Font #2: The second font is a nice bold Sans Serif font. There are no serifs and it is a mono-weight font.This is one of my favorite fonts right now and used in all caps. It’s a great contrast to a script font.

Font #3: The last font is an Oldtype font used in the ad copy. It has serifs and thick to thin lines. It’s easy to read and doesn’t compete with the stand out fonts.

Macaroni Grill advertisers did a great job of using a variety of fonts in their ad that have contrast and play well together. They repeated the use of both the script and the sans serif font to provide consistency and used a nice, readable oldstyle font for the ad copy.

Design

Reverse Engineering

Basic CMYK

Maybe it’s because I live near the ocean and surfing is a major sport here, but this poster really caught my eye. It’s simple yet bold and seems to have a lot of the design principles and color that I want to address as I re-engineer it and break it down.

Original designers:

Advertising Agency: Imelda Ogilvy, Slovenia
Creative Director: Jure Požun
Art Director: Branislav Milošević
Copywriters: Jure Požun, Bor Kolarič

Breakdown of why it works:
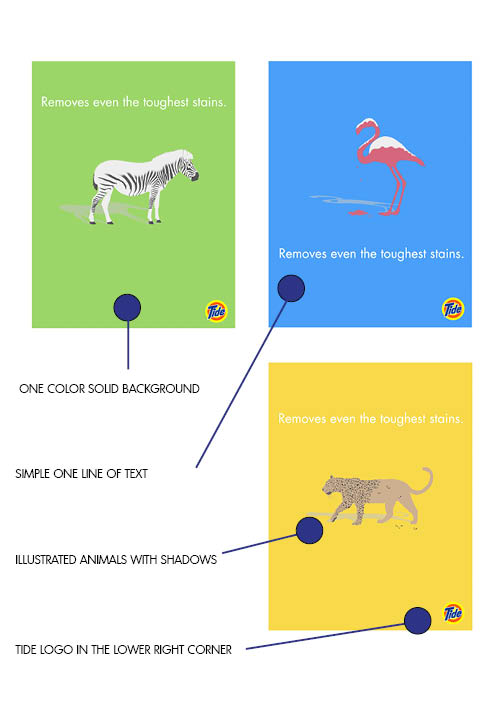
CONTRAST – There is really nice contrast between the soft, cool aqua and the warm, bright, bold orange. Set that off with the white font color (that also coordinates with the ice cream) and it all looks enticing.REPETITION – The repetition is with all the lettering being the same color. Although they used a few different fonts, the “2013” and “Taste” are the same. I do think that is one improvement that could be made. There are too many font choices, I think they could have gotten away with two and it would have looked more cohesive. ALIGNMENT – The main picture of the ice cream surfboard is right in the middle and a focal point of the design. The lettering is grouped to title and then information. They are centered together but then aligned to the left and to the right. The text also aligns nicely with the sides of the “surfboard”.PROXIMITY – The main focal point is set off enough from the lettering to make it stand out. The lettering is nicely placed away from each other to have the title stand out and then the information in another spot. This makes it easy to read and you know where to look on the page for the information you need.COLOR – The color combination they chose are complimentary colors. Orange and aqua are opposites on the color wheel so they look just awesome together. They stand out from each other but are complimentary. Aqua is reminiscent of the blue waters for a surf competition and orange feels sunny and warm.

Conclusion:
The surf festival poster has many great design elements that add up to an eye-catching design. There are contrasting, complimentary colors, text that is alignment in a readable way, and proximity of that text from the picture that helps it stand out. The repeated color of the text helps it’s readability and cohesion within the design. All in all the design is successful and fun.